Беспощадный registration form html. Форма входа и регистрации с помощью HTML5 и CSS3
Here is an example of Registration form using HTML. Here a programmer can display as many "Text Field" as he/she wants. The name in front of Text Field is called "Label". At the end of the registration form their is a "ADD" button behnd which any desired link can be used. Once clicked it will redirect to that particular destination.
Here is an example of Registration form using HTML. Here a programmer can display as many "Text Field" as he/she wants. The name in front of Text Field is called "Label". At the end of the registration form their is a "ADD" button behnd which any desired link can be used. Once clicked it will redirect to that particular destination.HTML Code for registration form
Here is an example of Registration form using HTML. Here a programmer can display as many "Text Field" as he/she wants. The name in front of Text Field is called "Label". At the end of the registration form their is a "ADD" button behnd which any desired link can be used. Once clicked it will redirect to that particular destination.
In this example we have shown 9 "Text Field". Size of the Text Box can also be changed as per the requirement.
registration.html
Registration form
Creating a membership based site seems like a daunting task at first. If you ever wanted to do this by yourself, then just gave up when you started to think how you are going to put it together using your PHP skills, then this article is for you. We are going to walk you through every aspect of creating a membership based site, with a secure members area protected by password.
The whole process consists of two big parts: user registration and user authentication. In the first part, we are going to cover creation of the registration form and storing the data in a MySQL database. In the second part, we will create the login form and use it to allow users access in the secure area.
Download the code
You can download the whole source code for the registration/login system from the link below:
Configuration & Upload
The ReadMe file contains detailed instructions.
Open the source\include\membersite_config.php file in a text editor and update the configuration. (Database login, your website’s name, your email address etc).
Upload the whole directory contents. Test the register.php by submitting the form.
The registration form
In order to create a user account, we need to gather a minimal amount of information from the user. We need his name, his email address and his desired username and password. Of course, we can ask for more information at this point, but a long form is always a turn-off. So let’s limit ourselves to just those fields.
Here is the registration form:
So, we have text fields for name, email and the password. Note that we are using the for better usability.
Form validation
At this point it is a good idea to put some form validation code in place, so we make sure that we have all the data required to create the user account. We need to check if name and email, and password are filled in and that the email is in the proper format.
Handling the form submission
Now we have to handle the form data that is submitted.
Here is the sequence (see the file fg_membersite.php in the downloaded source):
function RegisterUser() { if(!isset($_POST["submitted"])) { return false; } $formvars = array(); if(!$this->ValidateRegistrationSubmission()) { return false; } $this->CollectRegistrationSubmission($formvars); if(!$this->SaveToDatabase($formvars)) { return false; } if(!$this->SendUserConfirmationEmail($formvars)) { return false; } $this->SendAdminIntimationEmail($formvars); return true; }
First, we validate the form submission. Then we collect and ‘sanitize’ the form submission data (always do this before sending email, saving to database etc). The form submission is then saved to the database table. We send an email to the user requesting confirmation. Then we intimate the admin that a user has registered.
Saving the data in the database
Now that we gathered all the data, we need to store it into the database.
Here is how we save the form submission to the database.
function SaveToDatabase(&$formvars) { if(!$this->DBLogin()) { $this->HandleError("Database login failed!"); return false; } if(!$this->Ensuretable()) { return false; } if(!$this->IsFieldUnique($formvars,"email")) { $this->HandleError("This email is already registered"); return false; } if(!$this->IsFieldUnique($formvars,"username")) { $this->HandleError("This UserName is already used. Please try another username"); return false; } if(!$this->InsertIntoDB($formvars)) { $this->HandleError("Inserting to Database failed!"); return false; } return true; }
Note that you have configured the Database login details in the membersite_config.php file. Most of the cases, you can use “localhost” for database host.
After logging in, we make sure that the table is existing.(If not, the script will create the required table).
Then we make sure that the username and email are unique. If it is not unique, we return error back to the user.
The database table structure
This is the table structure. The CreateTable() function in the fg_membersite.php file creates the table. Here is the code:
function CreateTable() { $qry = "Create Table $this->tablename (". "id_user INT NOT NULL AUTO_INCREMENT ,". "name VARCHAR(128) NOT NULL ,". "email VARCHAR(64) NOT NULL ,". "phone_number VARCHAR(16) NOT NULL ,". "username VARCHAR(16) NOT NULL ,". "password VARCHAR(32) NOT NULL ,". "confirmcode VARCHAR(32) ,". "PRIMARY KEY (id_user)". ")"; if(!mysql_query($qry,$this->connection)) { $this->HandleDBError("Error creating the table \nquery was\n $qry"); return false; } return true; }
The id_user field will contain the unique id of the user, and is also the primary key of the table. Notice that we allow 32 characters for the password field. We do this because, as an added security measure, we will store the password in the database encrypted using MD5. Please note that because MD5 is an one-way encryption method, we won’t be able to recover the password in case the user forgets it.
Inserting the registration to the table
Here is the code that we use to insert data into the database. We will have all our data available in the $formvars array.
function InsertIntoDB(&$formvars) { $confirmcode = $this->MakeConfirmationMd5($formvars["email"]); $insert_query = "insert into ".$this->tablename."(name, email, username, password, confirmcode) values ("" . $this->SanitizeForSQL($formvars["name"]) . "", "" . $this->SanitizeForSQL($formvars["email"]) . "", "" . $this->SanitizeForSQL($formvars["username"]) . "", "" . md5($formvars["password"]) . "", "" . $confirmcode . "")"; if(!mysql_query($insert_query ,$this->connection)) { $this->HandleDBError("Error inserting data to the table\nquery:$insert_query"); return false; } return true; }
Notice that we use PHP function md5() to encrypt the password before inserting it into the database.
Also, we make the unique confirmation code from the user’s email address.
Sending emails
Now that we have the registration in our database, we will send a confirmation email to the user. The user has to click a link in the confirmation email to complete the registration process.
function SendUserConfirmationEmail(&$formvars) { $mailer = new PHPMailer(); $mailer->CharSet = "utf-8"; $mailer->AddAddress($formvars["email"],$formvars["name"]); $mailer->Subject = "Your registration with ".$this->sitename; $mailer->From = $this->GetFromAddress(); $confirmcode = urlencode($this->MakeConfirmationMd5($formvars["email"])); $confirm_url = $this->GetAbsoluteURLFolder()."/confirmreg.php?code=".$confirmcode; $mailer->Body ="Hello ".$formvars["name"]."\r\n\r\n". "Thanks for your registration with ".$this->sitename."\r\n". "Please click the link below to confirm your registration.\r\n". "$confirm_url\r\n". "\r\n". "Regards,\r\n". "Webmaster\r\n". $this->sitename; if(!$mailer->Send()) { $this->HandleError("Failed sending registration confirmation email."); return false; } return true; }
Updates
9th Jan 2012
Reset Password/Change Password features are added
The code is now shared at GitHub .
Welcome back UserFullName(); ?>!
License

The code is shared under LGPL license. You can freely use it on commercial or non-commercial websites.
No related posts.
Comments on this entry are closed.
With the revolution in the concept of web page design and maintaining, to develop a closer relationship with one visiting your page is important. The viewer may be in need of using it other times, on the other hand you get active visitors for your web page. Here the concept of sign in form and registration form pups up. Firstly, after having a look over the importance, we will approach with better way to insert some Beautiful HTML CSS Sign Up and Registration Form over your web page.
While surfing over internet, you come across the ready to use sign up forms. These forms ask the details of user like name, address, email Id, Photo, gender, job including biography. The sign up forms includes username and password as basic elements. Some of these components may vary as per the form you select but basic idea is to verify the identity of your user and develop better link with them.
Among many HTML, CSS forms over internet we have listed down some best one in terms of their compatibility, flexibility and space occupied. These will be of great help for you.
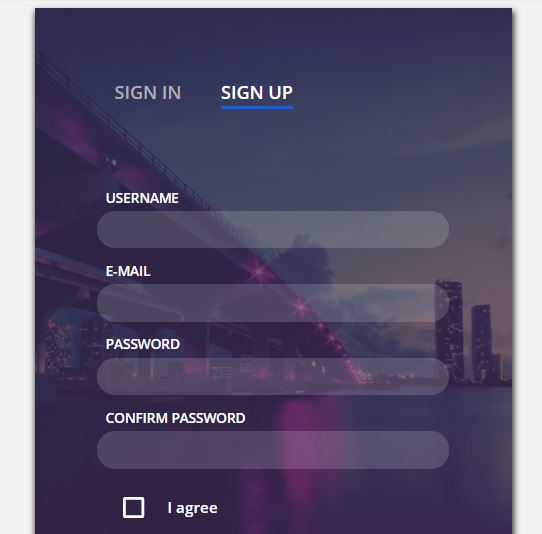
This full page, responsive CodePen is the creation of Dany Santos. The login forms only contain email and password whereas sign in form contains email, username and password. In addition these components only appear once you choose whether to log in or sign up. With the background animation this one looks attractive.

Similar to the first one this is also the CodePen by Eric whereas the component of forms is also similar. But, here the component appears in the same page so you don’t have to initially select to view the components. But admit the fact that with the plain background this one is less attractive but is flexible and light weighted.

This is simple looking registration form including plenty of examples. It is easily compatible with windows and androids as well. Moreover, designers himself have separated the forms in different categories like mini, labels in top, validity and so on. This is interactive and user friendly form example by tutorialzine.
Download and Demo

Jose Carnerioover made this simple and light weighted form by Jose over CodePen featuring to collect large number of information. It includes gender, date of birth and payment option including credit card number beside the basic one i.e. email and password. So this is best designed for online shopping and marketing.
Code and Demo

This compatible user friendly code for sign in and sign up form is the design of Josh Sorosky. It has a simple look and coded with HTML, CSS and JavaScript. Sign up Screen Animation only contain the basic things like username and password including email for sign up form.
Code and Demo
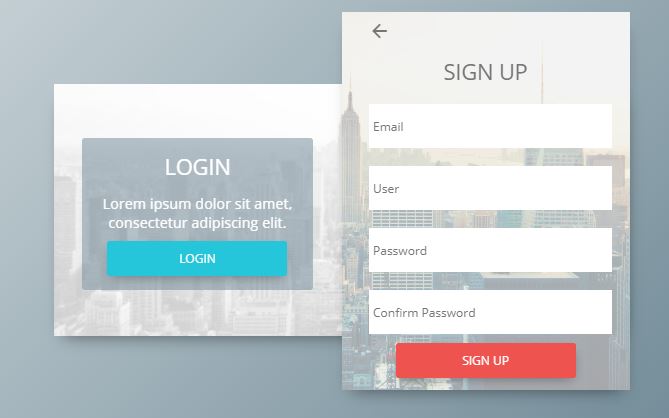
This attractive and beautiful log in and registration form is the creation of Grandvincvcent Marion. With the beautiful background picture and just basic component on forms this is actually popular with thousands of views. This is well flexible allowing easy modification and is a attractive one.
Material design log in sin up form is simple and extremely light weighted form by Brawada over CodePen. This composes of HTML, CSS and JavaScript codes and looks simple and beautiful. It just includes the basic component of forms and uses less space of your web page.
Download and Code

This is interactive, beautiful code by Kyle Lavery. Its simplicity makes it popular with, many thousand of view. Furthermore material Design Signup Interaction contains just basic component of forms but you can easily add up newer one as this is highly flexible. This is simple registration form over CodePen.
Code and Demo

Martin Machycek is popular developer in CodePen. He designed this very simple and good looking sign up and login form through HTML, CSS and JavaScript. In addition it is compatible and light weighted which is the best aspect of this form. It just included email and Password so better useful for simple WebPages then commercial one.
View Code and Demo
Sign in and Sign up – Single Form

This is interactive light weighted sign in and sign up forms by Dany Santos over CodePen. It is simple with just email and password so not well designed for commercial purpose. Because of its less weight and simple nature it has collected few thousand of view making it the attractive one.

This is interactive sign up form by Matthew Largent. Not only email and password but it also includes other personal information like age interest and biography. So this is useful for commercial sites and job searching sites. Moreover it has only HTML and CSS code, however is the useful one.
Code and Demo

This is the attractive sign up form by Kov Jonas. Moreover it provides with easy linkage with social media used by viewers. Furthermore this facility makes a frequent link u with viewers and furthermore even helps in advertisement of pages over social media. With the beautiful background image in addition to flexibility, it is well preferred.
View Code and Demo

This is extremely simple and light login form coded with HTML5 and CSS3. This is design of Aigars Silkans. It only included username and password so best designed for informative personal blogs and small websites. Fact that this has maximum number of views unlike some other CodePen is convincing.
Live Demo and Code

This beautiful sign up form is the creation of Momciloo Popov. Along with the simple components of a form it furthermore has an image side by that moves with the touch. It included all HTML, CSS and JavaScript codes.

Last but not the least, Sign up Daily UI is best login form for mobile phone by Gabrielle wee over CodePen. Moreover, it looks attractive with the background image and animation can easily replace that image. It just includes name, email and password.
Conclusion
Initially we know, among many aspects of your web page, registration and sign up follows the first order. This creates the profile of each user and moreover leads to better user management systems. In the first pace, HTML is the building block of everything and CSS makes things look attractive. So, HTML and CSS sums up making a beautiful HTML CSS Sign Up and Registration Form for your web page.
Для обмена данными между компьютером пользователя и сервером в HTML применяются формы . Обычно обмен данными происходит следующим образом: пользователь вводит требуемые данные в поля формы, после чего они отправляются на сервер, где обрабатываются соответствующей программой. Если это, например, регистрационные данные пользователя, то они проверяются на соответствие предъявляемым требованиям и, в случае успешной проверки, заносятся в базу данных. Пользователю при этом возвращается ответ, в котором либо сообщается об успешном завершении регистрации, либо предлагается возможность исправить ошибки, допущенные в ходе заполнения полей формы. Конечно, применение форм не ограничивается только лишь сбором данных от пользователей и передачей их на сервер для обработки, однако данное предназначение следует считать основным.
Тег
Пример 6.1. Использование элемента "form"