Безобидный member register php.
A tutorial for the very beginner! No matter where you go on the Internet, there"s a staple that you find almost everywhere - user registration. Whether you need your users to register for security or just for an added feature, there is no reason not to do it with this simple tutorial. In this tutorial we will go over the basics of user management, ending up with a simple Member Area that you can implement on your own website.
If you need any extra help or want a shortcut, check out the range of PHP service providers on Envato Studio. These experienced developers can help you with anything from a quick bug fix to developing a whole app from scratch. So just browse the providers, read the reviews and ratings, and pick the right one for you.
Introduction
In this tutorial we are going to go through each step of making a user management system, along with an inter-user private messaging system. We are going to do this using PHP, with a MySQL database for storing all of the user information. This tutorial is aimed at absolute beginners to PHP, so no prior knowledge at all is required - in fact, you may get a little bored if you are an experienced PHP user!
This tutorial is intended as a basic introduction to Sessions, and to using Databases in PHP. Although the end result of this tutorial may not immediately seem useful to you, the skills that you gain from this tutorial will allow you to go on to produce a membership system of your own; suiting your own needs.
Before you begin this tutorial, make sure you have on hand the following information:
- Database Hostname - this is the server that your database is hosted on, in most situations this will simply be "localhost".
- Database Name, Database Username, Database Password - before starting this tutorial you should create a MySQL database if you have the ability, or have on hand the information for connecting to an existing database. This information is needed throughout the tutorial.
If you don"t have this information then your hosting provider should be able to provide this to you.
Now that we"ve got the formalities out of the way, let"s get started on the tutorial!
Step 1 - Initial Configuration
Setting up the database
As stated in the Introduction, you need a database to continue past this point in the tutorial. To begin with we are going to make a table in this database to store our user information.
The table that we need will store our user information; for our purposes we will use a simple table, but it would be easy to store more information in extra columns if that is what you need. In our system we need the following four columns:
- UserID (Primary Key)
- Username
- Password
- EmailAddress
In database terms, a Primary Key is the field which uniquely identifies the row. In this case, UserID will be our Primary Key. As we want this to increment each time a user registers, we will use the special MySQL option - auto_increment .
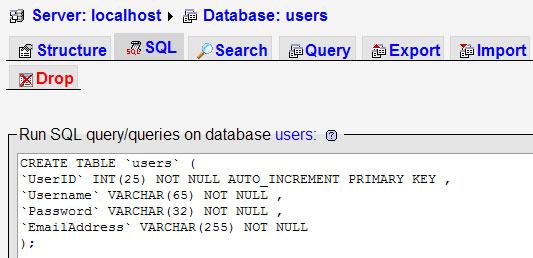
The SQL query to create our table is included below, and will usually be run in the "SQL" tab of phpMyAdmin.
CREATE TABLE `users` (`UserID` INT(25) NOT NULL AUTO_INCREMENT PRIMARY KEY , `Username` VARCHAR(65) NOT NULL , `Password` VARCHAR(32) NOT NULL , `EmailAddress` VARCHAR(255) NOT NULL);
Creating a Base File
In order to simplify the creation of our project, we are going to make a base file that we can include in each of the files we create. This file will contain the database connection information, along with certain configuration variables that will help us out along the way.
Start by creating a new file: base.php , and enter in it the following code:
Let"s take a look at a few of those lines shall we? There"s a few functions here that we"ve used and not yet explained, so let"s have a look through them quickly and make sense of them -- if you already understand the basics of PHP, you may want to skip past this explanation.
Session_start();
This function starts a session for the new user, and later on in this tutorial we will store information in this session to allow us to recognize users who have already logged in. If a session has already been created, this function will recognize that and carry that session over to the next page.
Mysql_connect($dbhost, $dbuser, $dbpass) or die("MySQL Error: " . mysql_error()); mysql_select_db($dbname) or die("MySQL Error: " . mysql_error());
Each of these functions performs a separate, but linked task. The mysql_connect function connects our script to the database server using the information we gave it above, and the mysql_select_db function then chooses which database to use with the script. If either of the functions fails to complete, the die function will automatically step in and stop the script from processing - leaving any users with the message that there was a MySQL Error.
Step 2 - Back to the Frontend
What Do We Need to Do First?
The most important item on our page is the first line of PHP; this line will include the file that we created above (base.php), and will essentially allow us to access anything from that file in our current file. We will do this with the following line of of PHP code. Create a file named index.php , and place this code at the top.
Begin the HTML Page
The first thing that we are going to do for our frontend is to create a page where users can enter their details to login, or if they are already logged in a page where they can choose what they then wish to do. In this tutorial I am presuming that users have basic knowledge of how HTML/CSS works, and therefore am not going to explain this code in detail; at the moment these elements will be un-styled, but we will be able to change this later when we create our CSS stylesheet.
Using the file that we have just created (index.php), enter the following HTML code below the line of PHP that we have already created.
What Shall We Show Them?
Before we output the rest of the page we have a few questions to ask ourselves:
- Is the user already logged in?
- Yes - we need to show them a page with options for them to choose.
- No
- Yes - we need to check their details, and if correct we will log them into the site.
- No - we continue onto the next question.
These questions are in fact, the same questions that we are going to implement into our PHP code. We are going to do this in the form of if statements . Without entering anything into any of your new files, lets take a look at the logic that we are going to use first.
Looks confusing, doesn"t it? Let"s split it down into smaller sections and go over them one at a time.
If(!empty($_SESSION["LoggedIn"]) && !empty($_SESSION["Username"])) { // let the user access the main page }
When a user logs into our website, we are going to store their information in a session - at any point after this we can access that information in a special global PHP array - $_SESSION . We are using the empty function to check if the variable is empty, with the operator ! in front of it. Therefore we are saying:
If the variable $_SESSION["LoggedIn"] is not empty and $_SESSION["Username"] is not empty, execute this piece of code.
The next line works in the same fashion, only this time using the $_POST global array. This array contains any data that was sent from the login form that we will create later in this tutorial. The final line will only execute if neither of the previous statements are met; in this case we will display to the user a login form.
So, now that we understand the logic, let"s get some content in between those sections. In your index.php file, enter the following below what you already have.
Member Area
We are now redirecting you to the member area.
"; echo ""; } else { echo "Error
"; echo "Sorry, your account could not be found. Please click here to try again.
"; } } else { ?>Member Login
Thanks for visiting! Please either login below, or click here to register.
Hopefully, the first and last code blocks won"t confuse you too much. What we really need to get stuck into now is what you"ve all come to this tutorial for - the PHP code. We"re now going to through the second section one line at a time, and I"ll explain what each bit of code here is intended for.
$username = mysql_real_escape_string($_POST["username"]); $password = md5(mysql_real_escape_string($_POST["password"]));
There are two functions that need explaining for this. Firstly, mysql_real_escape_string - a very useful function to clean database input. It isn"t a failsafe measure, but this will keep out the majority of the malicious hackers out there by stripping unwanted parts of whatever has been put into our login form. Secondly, md5 . It would be impossible to go into detail here, but this function simply encrypts whatever is passed to it - in this case the user"s password - to prevent prying eyes from reading it.
$checklogin = mysql_query("SELECT * FROM users WHERE Username = "".$username."" AND Password = "".$password."""); if(mysql_num_rows($checklogin) == 1) { $row = mysql_fetch_array($checklogin); $email = $row["EmailAddress"]; $_SESSION["Username"] = $username; $_SESSION["EmailAddress"] = $email; $_SESSION["LoggedIn"] = 1;
Here we have the core of our login code; firstly, we run a query on our database. In this query we are searching for everything relating to a member, whose username and password match the values of our $username and $password that the user has provided. On the next line we have an if statement, in which we are checking how many results we have received - if there aren"t any results, this section won"t be processed. But if there is a result, we know that the user does exist, and so we are going to log them in.
The next two lines are to obtain the user"s email address. We already have this information from the query that we have already run, so we can easily access this information. First, we get an array of the data that has been retrieved from the database - in this case we are using the PHP function mysql_fetch_array . I have then assigned the value of the EmailAddress field to a variable for us to use later.
Now we set the session. We are storing the user"s username and email address in the session, along with a special value for us to know that they have been logged in using this form. After this is all said and done, they will then be redirect to the Member Area using the META REFRESH in the code.
So, what does our project currently look like to a user?

Great! It"s time to move on now, to making sure that people can actually get into your site.
Let the People Signup
It"s all well and good having a login form on your site, but now we need to let user"s be able to use it - we need to make a login form. Make a file called register.php and put the following code into it.
Sorry, that username is taken. Please go back and try again.
"; } else { $registerquery = mysql_query("INSERT INTO users (Username, Password, EmailAddress) VALUES("".$username."", "".$password."", "".$email."")"); if($registerquery) { echo "Success
"; echo "Your account was successfully created. Please click here to login.
"; } else { echo "Error
"; echo "Sorry, your registration failed. Please go back and try again.
"; } } } else { ?>Register
Please enter your details below to register.